Showing posts with label taping. Show all posts

October 8, 2012

week 2: BLUE

Theme for week 2 of the 52 week challenge is blue. You know... like the color :) Below is what I came up with. Its hard to see how pretty the darker blue is in this pic, sorry! Also this isn't very cleaned up but oh well.


So I just wanted to show off this pretty bright blue color. This was the first time I used it because I thought it was a little dark for summer, but it is actually quite bright. It is "Ride the Waves" by China Glaze.

I wanted to do something simple, but also something I haven’t done before. So I did a simple chevron taped design. I started with just a square piece of tape turned sideways at the tip of my nail.

Then, to form the chevron/arrow shape, I used to pieces of tape abut 1/8 of an inch parallel to the square piece. Below is a pic. Sorry it’s hard to see! I really need to get some colored tape for these taping posts.

Then, the same old drill... paint one nail, remove tape, paint next nail, remove tape, and so on. The dark blue I used for the chevron is "Dive Bar" by Essie.
So there you have it. Some simple taping for a chic design. I love blue polish :)
 

October 2, 2012

week 1= TAPING


WEEK 1 of the 52 WEEK CHALLENGE!!

So the first week started this Monday (10/1) and the theme is TAPING! I have done this technique here and here on this blog before. I liked my splatter nails from the weekend SO much that I couldn't part with them just yet. Sooooo I just used them as the base :)
First I taped up my nails. I didnt really use any sort of pattern. Just did one strip of tape on each nail. Made the strips pretty thick so you could see the splatter design. Sorry the tape is kind of hard to see...


Then I painted on the gold color(Go for the Gold by Essie) that I used for the splatter.

Here is the final pic:


So here is a quick list of TIPS FOR TAPING that I have learned along the way:

1. Your base coat must be COMPLETELY dry. Otherwise it will be picked up by the tape when it is removed.

2. If you are worried about the base coat coming off with the tape, stick the tape once on your skin before applying it to the nail. This will make it less sticky, but hopefully still sticky enough to stay on your nail.

3. Remove the tape as soon as you paint on top of it. I usually tape one whole hand, paint one nail, remove tape, paint one nail, remove tape... etc. Then repeat with the other hand.

4. Make the lighter color the base color and the darker color the top coat. If you want the top color a light color you have to make sure it is opaque. You can't really wait for 3 coats to dry to take off the tape.

5. If you are using thin strips of tape, try to pre-cut them before applying. It is quite difficult to use a scissors with taped nails :) Below is how I had the stripes laid out for this one. I cut more than 10 just in case I didn't like some of the sizes.

So there you have it. Quick tips to taping and the start of a year of fun nails weekly!!

June 12, 2012

Technique: Summer Stripes

These fancy stripes are such a fun summer look! They take a little bit of time, but they are worth it. I’ve gotten tons of complements since I did these nails.


These fancy stripes are such a fun summer look! They take a little bit of time, but they are worth it. I’ve gotten tons of complements since I did these nails.

The way I usually do taping is to tape one whole hand first. I suggest taping your least dominant hand first because your second hand will have to be done with wet nails. 

After your taping is done on your one hand, start with the painting. Before you start, Set up your bottles on a paper towel opened and in the order you want to use them. This way you can paint and remove tape quickly. 

Colors I used (left to right): Fly by OPI, Fiercely Fiona by OPI, and Orange, It's Obvious! by Essie
Paint one nail at a time, and remove the tape immediately after taping. Below is the first painted nail before the tape is removed. Try to not run the paint into each other so your brush colors don’t mix.


Don’t forget to finish with a good topcoat! Don’t want all your hard work to chip right away. Make sure your nails are dry before you apply topcoat.

Good luck and happy summer times ;)

April 4, 2012

Technique: Argyle Tips

 This technique is a modern take on a classic pattern. The best part is... it’s pretty easy and doesn’t take long to do. Argyle is a cute preppy pattern, but also very detailed and usually needs to be perfect to look good. These tips only use a tiny portion of the pattern so it isn’t difficult at all!


The first step was obvi the base coat. I used a very sheer pink. I needed 4 coats of this pale pink Essie polish to get the color I wanted. I let this dry a loooong time before I did the next step.


Next was the taping! Since this is a look for your tips I had to be careful not to do a half and half diagonal. To do this I made sure that the tapes did not go corner to corner, but a little but higher than that. To the left is the diagonal tips in Mod Square by Essie (my favvvv pink right now).


Lastly was the dots in the opposite direction. The polish I used was Essie in Mint Candy Apple. I used a dotting tool for these diagonal dots so it was pretty easy. If you don't have a dotting tool you can use a pin head or bobby pin. Seche Vite top coat then I was done!

Below is the final look! I just looooove this look and I will most definitely wear it again!

|La


March 7, 2012

Technique: Little Blue Box


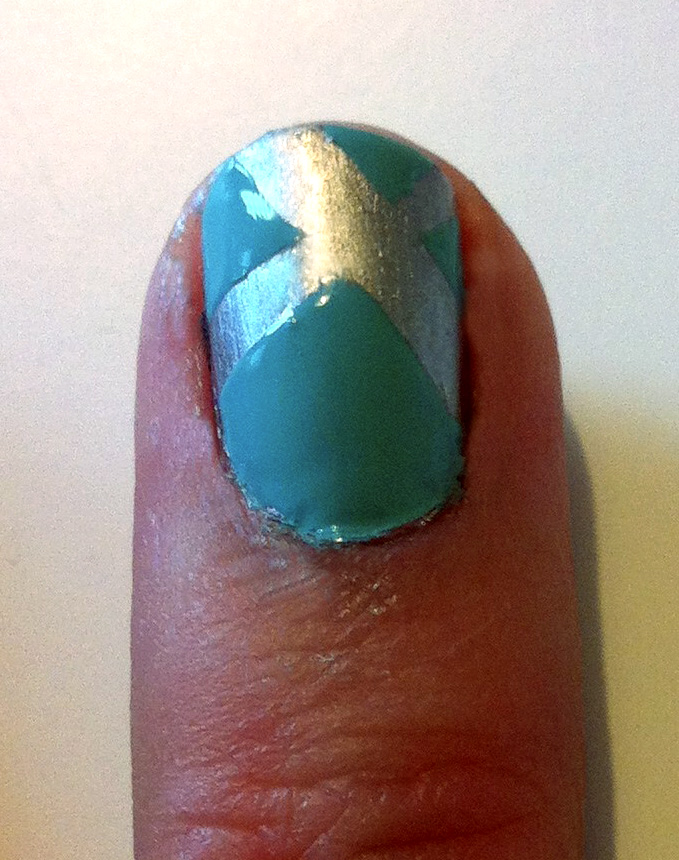
Above left is the final look and to above right was my inspiration. Of course I had that little blue box in mind for this technique. I found this Tiffany blue color “For Audrey” by China Glaze and thought this look would be perfect. I used the cross design because it reminded me of the X the ribbon makes on the box.

Undercoat: I started this look with 2 coats of a silver polish. To the left is the silver color I used, “Loophole” by Essie. I’m pretty much obsessed with this silver color because it has just the right amount of shine. Not crazy shine like chrome, but not dull enough to be considered grey. Perfect 925 silver ;). I even wore just these silver nails for a day because I love the color and wanted them completely dry before the next step! This technique would also be VERY cute with a bright white as the undercoat to match the Tiffany & Co box ribbon (or Red around Christmas time hee hee).


Tape: Next comes the not so fun part. This takes a while and it is QUITE a process, but the look is so worth it! Make sure your undercoat is completely dry before starting the tape otherwise your undercoat will peal! This will be sad and you will have to start all over- so just go read a book or watch a movie haha. To the left shows how I cut the scotch tape into stripes with a scissors. You need a very sharp scissors to avoid the tape bending instead of cutting clean. This is necessary to make a straight cut. I tried to make the strips proportional to my nail, just like the ribbon is proportional to the box.

Technique Steps: So here is the best way the taping and painting works…
1.  Tape all 5 nails on one hand. Make sure you mark which one is on top. Once you paint over you will not be able to tell. I folded down the end of the tape strip on the bottom so I knew which one to pull up first after polishing. Also make sure tape is pushed down securely  and there is no air bubbles.
2.  Paint the pinky first. This way you will not smudge your other nails as you go. Do an even coat: not too thick, but thick enough to not have to do a second coat.
3.  IMMEDIATELY remove the pinky nail’s tape. If you don’t do this right after you paint the polish gets tacky and smears.
4.  Move on to paint the ring finger, and immediately take off the tape again.
5.  Repeat step 4 with the rest of your fingers.
6.  Let this hand dry before you start cutting tape for the other hand. This prevents many smudges and frustration…
7.  Tape the other hand, start with the pinky again, and repeat process.

Summary: Tape hand, paint pinky, remove pinky’s tape, repeat… Tape other hand, paint pinky, remove pinky’s tape, repeat…


To the left is a nail after the tape is removed. As you can see it is easy to tell the different thicknesses of the silver and blue polish. That is why a thick coat of fast drying top coat is necessary. I used Seche Vite. This soothes the nail and prevents chipping.


And I said, what about, nails just like Tiffany’s…. :)


February 26, 2012

Technique: Diagonal 2-tone


I got the idea for diagonal 2-toned tips look from one of my good friends Kaci’s stylish nails. A picture of the nails she did is to the left. She did a diagonal two tone with nude and black on the ring finger. I thought this look would look awesome on all my nails so I tried it out...


Since I am obsessed with glitter polishes lately I used a glitter instead of a solid as my tip color. The colors I used... Base: “Violet Vixen” by L’Oréal Paris. Tip: Gem Crush in “Big Money” by Sally Hansen.

Other great color combos would be:
- light color base, darker variation of same color as the tip.
Example: base= pale blue, tip=navy
Or...........base= pale pink, tip=bright red
- neutral color base, black or dark brown or dark grey tip
            Example: base=nude, tip= black (like Kaci’s nails!)
- bright and light base, brighter and darker tip.
Example: base=neon yellow, tip= hot pink.
Or.......... base=neon orange, tip=lime green.


 I started with the base color I new I wanted (Violet Vixen) and painted all 10 nails that color. Then I tried the diagonal tip on just one nail to make sure I liked the color and made sure it turned out opaque enough to cover the base color. That’s why all my above combo’s have the lighter color for the base... you want to make sure your tip color completely masks the base color. The glitter polish I used was very thick and I wanted it to completely mask the violet... which it did!


So then I moved on to tape all my nails with clear scotch tape (above). It was useful to use this kind of tape because you can see if the tape is rising up anywhere on the nail.. you dont want your tip polish to bleed under the tape! For the most part I tried to leave a little more space for the violet.. I thought it would look nice if the diagonal was closer to the top so it looks more like a tip accent then half and half. I thought half and half might be a little overwhelming on all my nails with that much glitter :) 


Dont forget to angle your right hand the opposite direction of your left hand! It looks more symmetrical that way. Above is my right hand after I painted on the Gem Crush polish.

 Now comes the tricky part: peeling off the tape. I would recommend doing this right after you paint the tips on one hand... This way you can fix up your messes right away because the polish is still moldable. In the second picture on the left I am using a nail art stick, but I found that even a light press of my finger worked just as well. As you can see in the top picture the tip polish fans up a little bit right where the tape was.. If you just tap it down with your finger it flattens out and looks great!


So here is the order of how I did this, it worked out pretty easy with no mess ups this way:
    1.     Paint all 10 nails the base color. Let dry COMPLETELY. Optional: one coat of quick dry topcoat.
    2.     Tape one finger and test out tip color.
    3.     If you like it, tape the rest of the fingers on that hand and paint on the tip color.
    4.     Remove tape and press down mess ups, one finger at a time.
    5.     Paint on a thick, clear top coat and let dry.
    6.     Repeat steps 3-5 on other hand.


 Violà !  Here’s a final look at the tilted 2-tone tip technique (say that 5 times fast haha).