Showing posts with label China Glaze. Show all posts

November 27, 2012

Week 9: Rainbow


Week 9 theme of the 52 week challenge is RAINBOW. This is also the first time I have done this technique on my blog. I decided I'm calling this a dripping paint rainbow.

Just for fun, I painted my nails with matte polish first for a nice contrasting base coat.


So here is my set up: Polishes for the nail I'm doing, 2 cut off plastic cups (one with a couple drops of each polish and one filled with nail polish remover), a thin paint brush or nail art brush, and a folded paper towel.


Below on the left is the red. On the right is after I painted the light pink and hot pink. Not much to this technique. I just dipped the thin paint brush in the polish and painted some thin stripes of alternating lengths.  I did this once with each color, then repeated each color to get a sort of layered look.


In between switching colors, I swished the paint brush in the cup with nail polish remover then wiped it off on the paper towel. 


Here's all the colors I used! (I listed them all left to right)

For Red/Pink:  Burgundy Flirt by Rimmel London, I'm Indi-a Mood for Love by OPI, and Brushstroke blush by Finger Paints


For Orange/Yellow:  Harvest Moon by China Glaze, Peachy Keen by China Glaze, and Pull Over by Sinful Colors


For Green: Navigate Her by Essie and Kissy by Sinful Colors


For Blue: Want my Bawdy by China Glaze, Why Not by Sinful Colors, and I Vant to be A-lone Star by OPI


For Purple: It's an original by Finger Paints and No Plain Jane by China Glaze


phew!! That was exhausting typing all those polish names out. Here's one more pretty dripping rainbow pic!


November 21, 2012

Week 8: Cling Wrap Technique


This week is week 8 of the 52 week challenge and the theme is Saran/cling wrap technique. If you've never heard of it before it is pretty simple... I'll list the basic steps with additional tips to this technique are at the bottom of the post. In my opinion this technique is easy to do, but it is difficult to get colors that look good using this technique. Some combos can look just messy or dirty.


Base Color used: Champagne Toast by Sally Hansen

Basic steps:
1. Paint base color. 
2. Paint second polish on.
3. Dab crumpled cling wrap on nail.  

Second color used: No Plain Jane by China Glaze.


Tips:
- Let base coat(s) dry completely on all nails before you move on to steps 2 and 3.
- Do NOT let second polish color dry before moving to step 3. Do step 3 almost immediately after step 2.
- Do steps 2 and 3 on each nail right after another.
- Crumple up the cling wrap as tight as you can so you get a wrinkled surface like this.

- Your second polish must be a thick polish that doesn't dry two quickly. This technique only works if you can successfully pick up the second color with the cling wrap ball, and still get some to stay on the nail.
- Final and MOST IMPORTANT TIP: only dab the cling wrap 2-3 times. You want a nice balance of the two colors and more dabs will pick up too much of the second color and distort the design.

Overall, it took me a few tries to get colors that I liked together. I think I really only like metallic colors with this look. I tried solid grey and it just wasn't happenin.. looked too dirty and like I messed up. Here's one more pic with day light.


November 4, 2012

Combo: Fresh Winter Snow

Ugh I am so embarassed. I had an old copy of the schedule so I thought that week 6 of the 52 week challenge was winter, but it is not! Whoops, it is actually "Inspired by a Game" so I guess I will have to do some new nails tonight! Darn it... the one week that I actually did it early haha oh well. Here's a pretty sparkly pale blue combo!

It's not quite winter weather yet here in the Chicago land area, but hey this combo is still pretty to look at :). I went for a simple combo of polishes to make a fresh winter snow look.


First polish: 2 coats of a pale blue or white polish. I used "I Vant to Be A-lone Star" by OPI


Second polish: 1 coat of a sheer, iridescent polish. I used "Rainbow" by China Glaze


Third polish: 1 or 2 coats of a pearlescent glitter. I used "Make a Spectacle" by China Glaze


Here's one more pic, but the one at the top of this post definitely looks the best on how this turned out.


October 24, 2012

Combo: Mint + Whimsical

I love love love this combo. It looks like frosting and sprinkles or some sort of dessert. I just want to eat it right off my fingers!

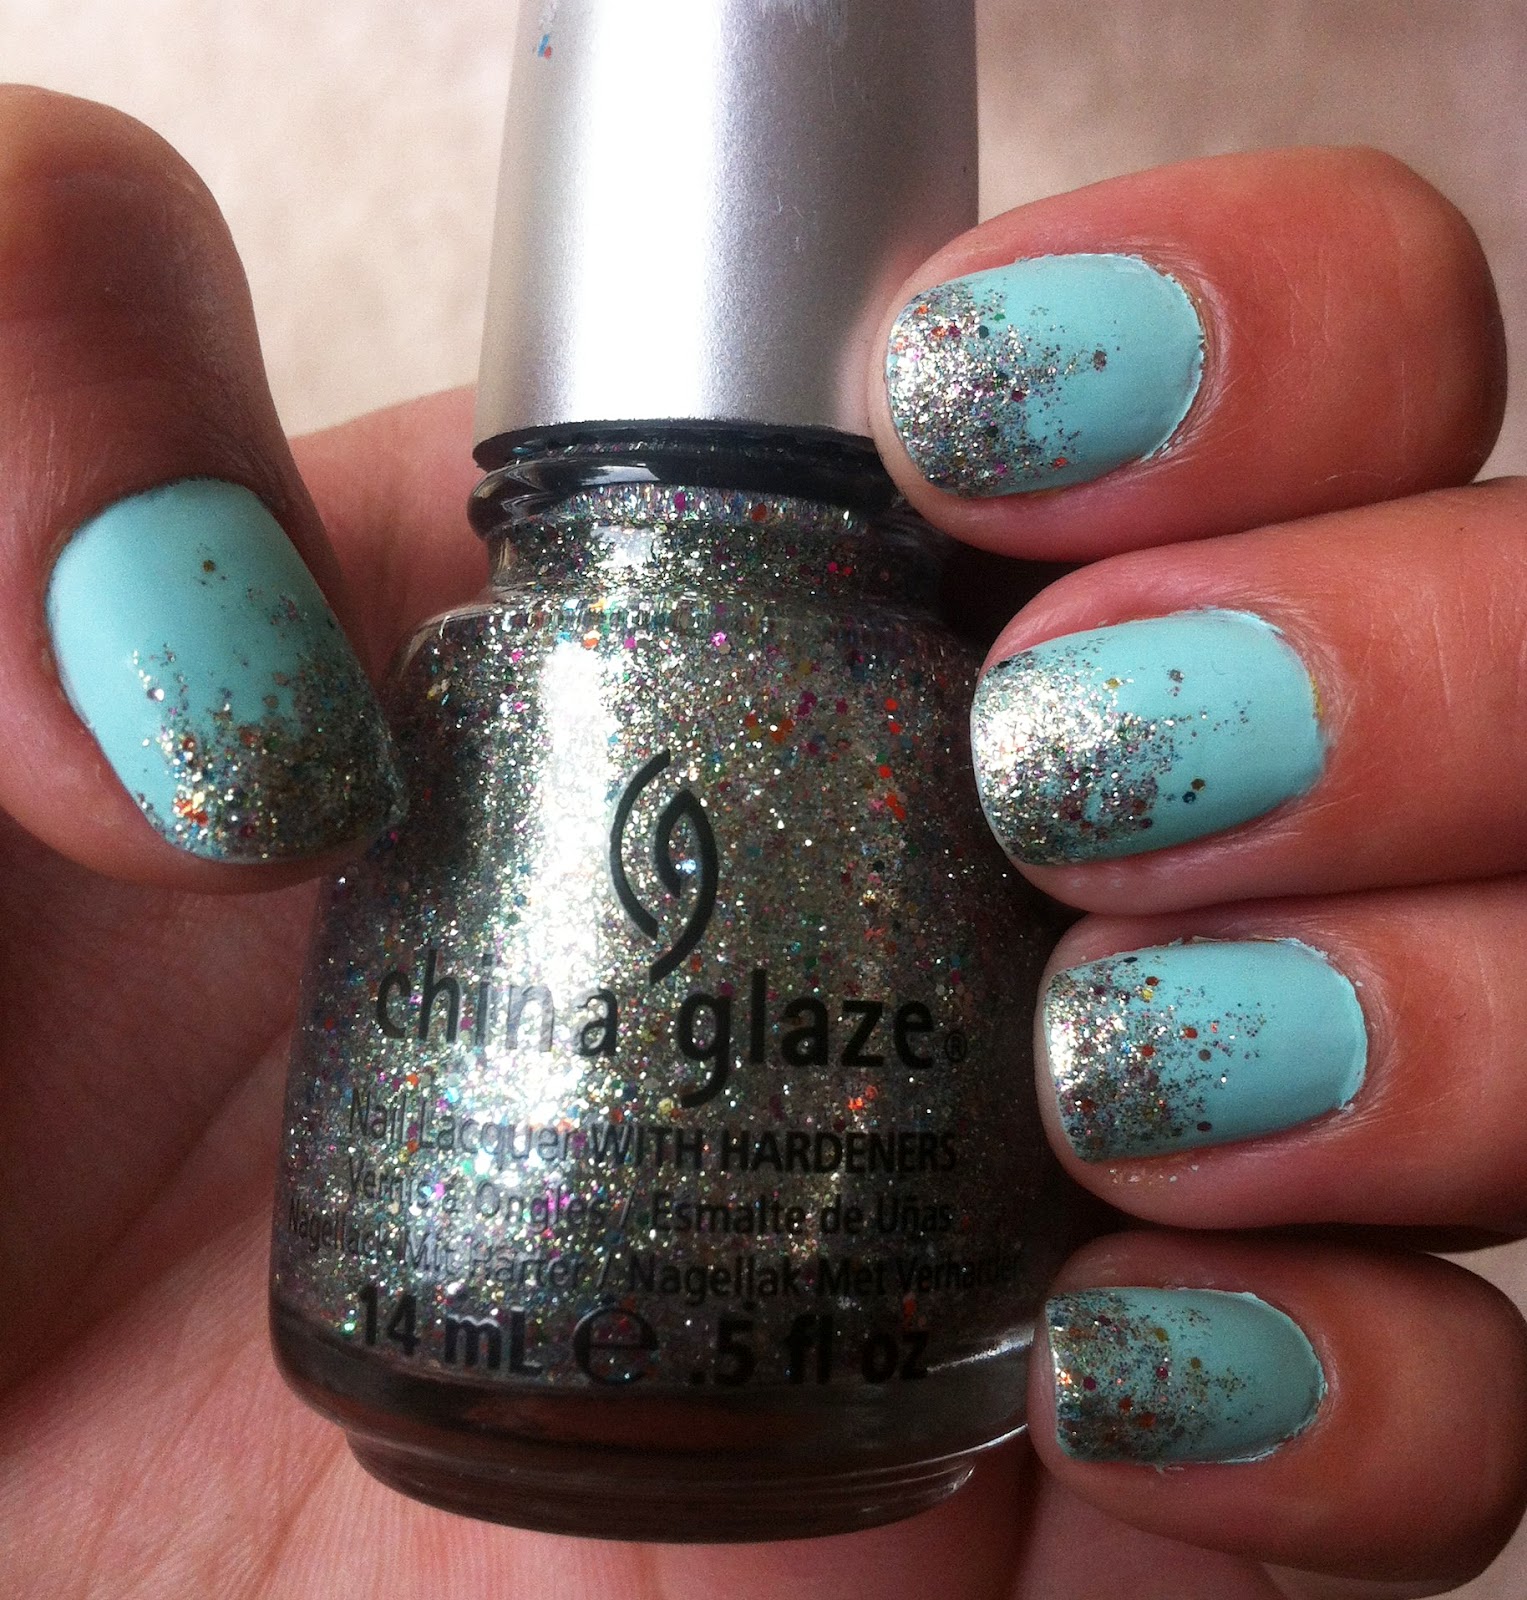
Colors I used are: Re-Fresh Mint by China Glaze (base coat) and Whimsical by Revlon (Deborah Lippman Glitter in the Air dupe!)

I did this combo because I was not too impressed with Whimsical by itself. Here is a picture of Whimsical without the mint base coat… this is 3 coats of Whimsical too!

So here is Re-Fresh Mint by itself. A pale blue opaque/crème polish would also do the trick! This mint is more blue than green anyhow.

So in all it is 2 coats of Re-Fresh Mint and 2 coats of Whimsical. For the Whimsical polish I "dabbed" it on to make sure I got some nice hex glitter pieces on my nail.
Here is a couple more pics… Yummy!!

October 23, 2012

week 4: GRADIENT

Week 4 of the 52 week challenge is here and the theme is Gradient or Ombre nails!! This is good explanation on the difference between Gradient, Ombre, and Skittle techniques (when talking about nails). I decided to conquer gradient nails this week. For months, gradient nails have been my archenemy. For some reason, I just could not get this technique to work. I have tried MULTIPLE times and things just were not working out for me. However, I finally got some results! I tweaked a few things in what I was doing and switched the kind of sponge I was using. Tips for best results are at the bottom of this post. Here was my final look:

Colors I used (from left to right): No Plain Jane by China Glaze (Base Coat), Good as Gold by Essie, and Swing Baby by China Glaze (accent color dabbed on top of the tips)

Tips:
-          Here is a good video (The Polished Mommy) to show the technique I did for Gradient nails.

-          Make sure the sponge is saturated to the max! If it is not super saturated you will get a bubbly texture that looks too spongy. However, in the opposite direction if the polish is not soaked into the sponge (just sitting on top), it will not blend well and you will have a hard line between your colors.
      Here is what my sponge looked like ( the sparkly color on the right is Swing Baby which I dabbed on the tips of my nails for a little sparkle)

-          Keep your polishes open so you can quickly saturate the sponge with your gradient colors in between rolls.

-          If you use a sheer polish make sure it is the same as your base coat. In the video in the first tip, she uses black for a base coat. This only worked because her top/gradient polishes were opaque. The purple I used for this look was very sheer, so I made sure to use the purple as my base coat as well.

-          Layer your “rolls” of the sponge so the line between the colors doesn’t always match up.  This helps you have more of a gradient and less of an immediate change between the colors.

-          If the sponge you’re using isn’t working for you, try a different one. The old brand of sponge I tried was making my look to bumpy and bubbly. These sponges worked out well for me.
-          Cut the sponge in half to conserve sponges!

-          For skin clean up, use a plastic cup cut off filled with polish remover and an eyeliner brush. Dip your brush in the polish remover and wipe on a paper towel in between cleaning of the finger. (after you use an eyeliner brush for polish remover, do not use it for your face again)


 TA DA!!!! I’m so happy it finally turned out good!


October 19, 2012

Combo: Indigo + Techno

So yesterday I was trying out a few different designs and none of them were working out. It got very frustrating. Here’s what I said to that: when all else fails, add glitter! So here is a simple combo of a pretty circle iridescent glitter and a pretty indigo.
The colors I used were,
Base: Want my Bawdy by China Glaze (Bohemian Collection)


Glitter: Techno by China Glaze


To apply the glitter polish I just made sure the brush was heavily saturated with the chunky glitter and dabbed at my nail, starting at the cuticle. To make the glitter sort of float up did a few lighter dabs farther up the nail. Pretty simple, and it doesn’t have to be perfect to look good. For some reason the indigo is photographing bright royal blue, but it is actually a little more purple than these pics show.


I love this dark indigo with the iridescent glitter, but this Techno glitter would also look great with a mint or light pink polish :)

October 12, 2012

Technique: Freehand Fishtail

I just saw this technique the other day on Reddit Laqueristas. It looks sort of like a fishtail braid. I've seen people do it much thicker than this, but if you layer the polish swipes you can get the stripes much thinner... like this!


After you've done your top coat on all 10 nails, set up all your striping polishes unscrewed in the order you want to use them. Here is mine all set up. Colors from left to right are: Why Not by Sinful Colors, Orange It's Obvious! by Essie, Houston we have a Purple by OPI, Fly by OPI, and Electric Pineapple by China Glaze.


Here's a step by step pic tutorial of how I did this fishtail look. Basically its just an alternating layered striping technique. You just use the polish brush for the stripes. The last step is in the next pic.


After you finish the striping you cover up the bottom in your base color. I used a nail art brush for better control.


Tips:
- Use a thin polish if you can and make your stripes as thin as you can.  The thinner the stripes the less the layers mix together.
- Use a sheer polish if you want the layer overlaping to show up.
- GO SLOW. this is why I only did two nails each hand. I had to go very slow to paint in a straight line.
- to have more control of your brush, steady your "painting hand" on the surface your painting. i.e. rest the pinky or ring finger of your painting hand on the table your left hand is resting on. This should steady your hand a little bit.


October 4, 2012

Combo: Fall Flecks

So the whole point of this blog is that the nails *should* be easy enough for you to try yourself. I'm all about struggling through a manicure and then posting my tips/techniques/critiques so my readers don't have to suffer with what doesn't work like I did. However, sometimes I just find a nice combination of polishes that look good together that I want to share and then I think "wait a minute, that isn't a tip, technique or critique....so I can't post it"

Therefore, I decided to add a new type of post... From now on, "combo"s will be posts that are simple and to the point with what polish colors I found look good together. Or maybe it will be an old technique I've already posted about with a new combo of colors. So here is the first COMBO post!!
  
I did this combo because I thought it looked very Halloweeny! I love Halloween and October in general so why not start with the Halloween nails a little early. Besides it's not like I'm painting a pumpkin on my thumb nail. Pretty fall flecks:
  
I have used this glitter polish before in this technique. It's funny how flakie polishes look completely different depending on what sort of base coat you use. On the technique linked above, the flakie glitter I used (Luxe and Lush) looks more diamondy and blueish silver. On the black I used in this combo it looks orange and green... Almost like copper metal flakes embedded in clear polish. Perfect for pumpkins! And on top of the black polish I think the glitter stands out more. Very Halloweeny/Fall like.

I hardly ever wear black polish so the base coat I used is just the solid black I've had for years. It's Beguiling Black by Maybelline Express Finish. Still worked pretty good though!


This is another polish that looks like orange glitter flecks when you paint it on a dark color. I know the polish looks pink but the glitter looks orange and green.

May 17, 2012

Technique: Matte + Sparkle Tips


I've been MIA for a while on this blog. I had a rough couple of weeks and then was out of the country so no posts for about a month....
But now I'm back :)
I am just obsessed with greens lately. Chartreuse, avocado, pistachio, and most of all MINT. I found this glitter that I just had to have and when I took it home I realized it would look gorgeous with a mint polish.
I was bored of the plain old sparkle tips so I added some Matte in the mix. Tip: do NOT put the Matte top coat over a glitter polish. It looks icky... trust me. 

So the order goes... 2 coats of color polish (I used Mint Candy Apply by Essie). 1 coat of matte top coat (I used Matte About You by Essie)... This isn't a great pic but you get the idea.


Then sparkle tips. This really only works with highly concentrated glitter polish. This one is Ray-Diant by China Glaze. The key to the sparkle tips is to do very thin strokes of the glitter. then when you have the tip done dab a few straggler glitter pieces more towards the bottom of the nail. 

If your like me and hate the feel of these kinds of glitter polish you can cover the glitter part with a clear top coat. Just be careful not to cover the matte portion!

Viola! a great contrast of Matte and Sparkle :)

March 27, 2012

Technique: Moon Phases

Phases of the Moon

This look was inspired by the phases of the moon. It was actually quite simple. The only difficult part was making my right hand’s “moons” look symmetrical to my left.


First step was the shinny color for the moon. I think a silver, gold or grey would look good for this. The color I used was China Glaze in “Swing Baby”. It’s a light gold with a pale pink tint to it. VERY pretty. I wore this one by itself for a day before I did my moon phases just because I liked the color so much. To the left is this base coat, 2 coats.


Next was taping. As always, nails have to be COMPLETELY dry before taping. I used French tip tapes for this look. On the left, starting with the pinky (1) I gradually tapped less to more of my nail. Nails 1, 2, and 3 I used the bottom of the arc as a guide. For nails 4 and 5 I wanted the moon to be mostly full, so I used the top of the arc as a guide. It was difficult because you have to think in negative space. Remember, you cover with the tape is what will be showing when your done.


I used a solid black paint for the shadow on the moons. This one is Beguiling Black by Maybelline express finish. I have a step by step of what the painting looks like below. Tape all nails on one hand first. Then paint and remove tape immediately one nail at a time.


And just as an afterthought I added a stripe of silver in between the moon and the shadow. Here is what it looks like below.


Mooooon Shadow Moon shadow =]

| La