Showing posts with label silver. Show all posts

December 21, 2012

Technique: Dark Clouds


Winter Storm DRACO is here!! I didn’t even know we named snow storms haha. I’m not sure that is necessary. But in light of the storm yesterday, I am posting my dark cloud manicure. If you haven’t seen the cloud mani done before, here is a tutorial. I think Nailside was the first place I saw this done. It is a super easy technique and doesn’t require any additional tools! Just a fairly steady hand to get the straight polish strokes. I’ve seen it usually done with two clouds, but I love this top color so much I wanted to see as much of it as I could!

Here are the polishes I used. Base coat (dark purple) is It’s an Original by Finger Paints. The cloud color/top coat I used is Knackered by Butter London. This one of the coolest polishes I own. It looks best over dark colors, so that is why I used the dark purple as a base coat.

Sorry I don’t have any pics of the dark purple base on my nails but I believe I did 2 coats. Below is a few pictures of the final product. The Knackered is a silver with a sort of rainbow duo chrome. It looks sort of lavender on top of this dark purple, but when you look at the nail sideways it almost looks greyish turquoise.  And the tiny rainbow sparkles in Knackered remind me of rain. Perfect for dark clouds! Love this combo!  

I tried to take a sideways picture so you could see the turqoise duo chrome color but it didn' t turn out the greatest lol.

December 15, 2012

week 11: glitter

Today is week 11 of the 52 week challenge! This is sooo late because the week started on Sunday the 9th, but oh well! The theme is GLITTER!!!! So of course, I had to use as many glitters as I could on one nail... I tried to find ones in my collection that have similar colors. So basically I just picked out the silver with rainbow ones. I would call this a 4-glitter gradient.


I started with a silver polish. This is Smoldering by Revlon.


I basically just painted/dabbed each glitter polish in uneven stripes on my nail. I started at the cuticle with the finest glitter first. This is Glistening Snow by China Glaze.


Next came Ray-Diant by China Glaze. This is one of my favorite glitters.


Next, Pizzaz by China Glaze. This one is new with the winter season. pretty similar to the one above but a little larger glitter pieces.


Now for the largest glitter! This is Pinata-yada-yada by Ulta. I had to do another coat after this picture below because there was a lot of silver still showing.


Heres one more pic... If I ever do this again I would just do 3 glitters and ommit the first one (Glistening Snow). It was the only one that had more of a bright white tint to it. The other 3 glitters had more of a yellowy silver tint.

December 13, 2012

Combo: Moonraker + The Living Daylights


The poilshes used in this combo are both OPI colors from the Skyfall collection. I think they are my two favorites from the collection actually. Maybe with the exception of the 18k Gold one of course haha. I thought these two just looked fabulous together!

The aqua-silver is Moonraker by OPI. This one took 3 coats to perfect. The first two coats went on very stripy and you could see the brushstrokes. So I basically did 2 really thin coats so they dried quickly and then one fairly thick and even coat to finish.


The glitter is The Living Daylights by OPI. For this large hexagonal glitter I tried to dab on one coat as evenly as possible then I went back in after the first coat of glitter dried a little and dabbed in some more glitter in the empty spaces. I wanted the glitter to be sparse enough so you could see the beautiful Moonraker underneath!


November 8, 2012

Combo: Smoldering + Fowl Play

Yesterday, I was having a very hard time being inspired nail-wise. So I picked up a few polishes, walked over to my boyfriend, and asked “Which of these goes together well?”. I just love him. His response was, “Well, these two don’t ‘go together’, but I think they would look cool together”.  So this combo is all because of him, Thanks babe :). I think it turned out great!

First/Base Coat:  Smoldering by Revlon. This silver is really pretty because at first glance it looks like a plain old metallic silver, but when you move the nail you can see a little pale pink duo-chrome goin’ on.

Taping! This is just a simple vertical taping. Same old drill (Tape all of one hand, paint one nail, remove tape immediately, paint next nail, repeat…)


Second Coat: Fowl Play by Orly. I really couldn’t quite capture the beauty of this polish. It is so dynamic. It is a dark purple with a flaky pink and red glitter. I can stare at it all day!

Top Coat: Matte About You by Essie. I loooooove Fowl Play with the matte coat on top. You can see it better and it looks very modern.

Here’s some more pics!

March 7, 2012

Technique: Little Blue Box


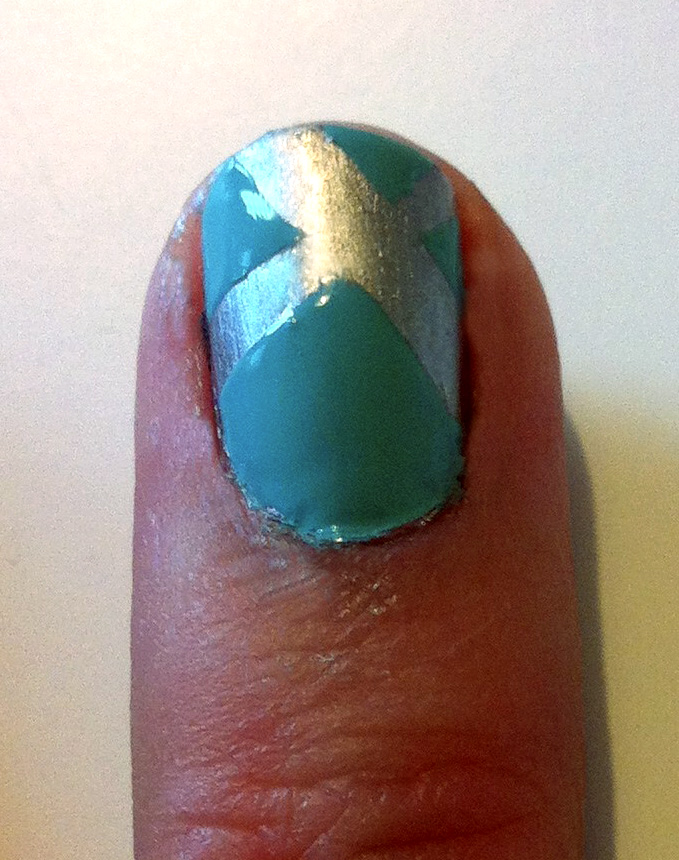
Above left is the final look and to above right was my inspiration. Of course I had that little blue box in mind for this technique. I found this Tiffany blue color “For Audrey” by China Glaze and thought this look would be perfect. I used the cross design because it reminded me of the X the ribbon makes on the box.

Undercoat: I started this look with 2 coats of a silver polish. To the left is the silver color I used, “Loophole” by Essie. I’m pretty much obsessed with this silver color because it has just the right amount of shine. Not crazy shine like chrome, but not dull enough to be considered grey. Perfect 925 silver ;). I even wore just these silver nails for a day because I love the color and wanted them completely dry before the next step! This technique would also be VERY cute with a bright white as the undercoat to match the Tiffany & Co box ribbon (or Red around Christmas time hee hee).


Tape: Next comes the not so fun part. This takes a while and it is QUITE a process, but the look is so worth it! Make sure your undercoat is completely dry before starting the tape otherwise your undercoat will peal! This will be sad and you will have to start all over- so just go read a book or watch a movie haha. To the left shows how I cut the scotch tape into stripes with a scissors. You need a very sharp scissors to avoid the tape bending instead of cutting clean. This is necessary to make a straight cut. I tried to make the strips proportional to my nail, just like the ribbon is proportional to the box.

Technique Steps: So here is the best way the taping and painting works…
1.  Tape all 5 nails on one hand. Make sure you mark which one is on top. Once you paint over you will not be able to tell. I folded down the end of the tape strip on the bottom so I knew which one to pull up first after polishing. Also make sure tape is pushed down securely  and there is no air bubbles.
2.  Paint the pinky first. This way you will not smudge your other nails as you go. Do an even coat: not too thick, but thick enough to not have to do a second coat.
3.  IMMEDIATELY remove the pinky nail’s tape. If you don’t do this right after you paint the polish gets tacky and smears.
4.  Move on to paint the ring finger, and immediately take off the tape again.
5.  Repeat step 4 with the rest of your fingers.
6.  Let this hand dry before you start cutting tape for the other hand. This prevents many smudges and frustration…
7.  Tape the other hand, start with the pinky again, and repeat process.

Summary: Tape hand, paint pinky, remove pinky’s tape, repeat… Tape other hand, paint pinky, remove pinky’s tape, repeat…


To the left is a nail after the tape is removed. As you can see it is easy to tell the different thicknesses of the silver and blue polish. That is why a thick coat of fast drying top coat is necessary. I used Seche Vite. This soothes the nail and prevents chipping.


And I said, what about, nails just like Tiffany’s…. :)


January 12, 2012

Technique: Snowy Sparkle Tips


Snowy Sparkle Tips

In honor of the first snow fall of winter, I am making my first post my snow flake inspired sparkle nails. I used Sally Hansen Gem Crush. This is a new line by Sally Hansen that I absolutely loveeee because it has two different colors and sizes of glitter in it. It's great for pairing with alike colors or mixing with other glitter polishes. The color I used here is 01 Showgirl Chic, on top of a french tip white. 

Technique: I started with two coats of the white polish and made sure to let that dry well, so it doesn't blend with the glitter nail polish. Then I put a good amount of the Gem Crush polish on the tip of the nail. With the tip of the polish brush I dragged some of the Gem Crush down from the tip to make it look like the glitter was fading into the white part of the nail. Lastly I finsihed with a good clear top coat. I noticed that sparkle polish chips a lot easier than regular polish so definitely dont forget the top coat!