March 13, 2012

Critique: Seche Vite


Two words: Seche Vite. This top coat is the best all time top coat I’ve ever used. I’ve heard of people saying it was a good one, but I just now got around to trying it. It is a fast drying and strong clear top coat that protects your nails VERY well. I think this was the first time I took off nail polish because I got bored of my nails, not because they were too chipped. So funny…


In terms of fast drying, it dries pretty good in about 15 mins and dries completely in about a half hour. This is great in terms of nail polish. I’ve messed up manicures that have already dried for 2 hours before.


In terms of durability, it’s definitely the best I’ve tried. First of all, with this polish I received ZERO chips for the first 2 days. This is unheard of for me since I tend to be clumsy and fidget a lot with my fingers/nails. The picture below (sorry not the greatest, tried to get all my nails in) is after 5 days of wear, including showering every day, washing dishes, typing all day, etc... I have a chip on my left pointer (from nibbling on my nail for better concentration of course) and overall all my nail polish wore down a little on the nail tips. Still, this is great improvement from any other top coat I have used.


Summary of Critique: Seche Vite is a MUST HAVE top coat. Love love love!

I got it at Sally Beauty for $8 (it was $10 at Ulta), but I found it for $4.49 on this site... nice!


March 7, 2012

Technique: Little Blue Box


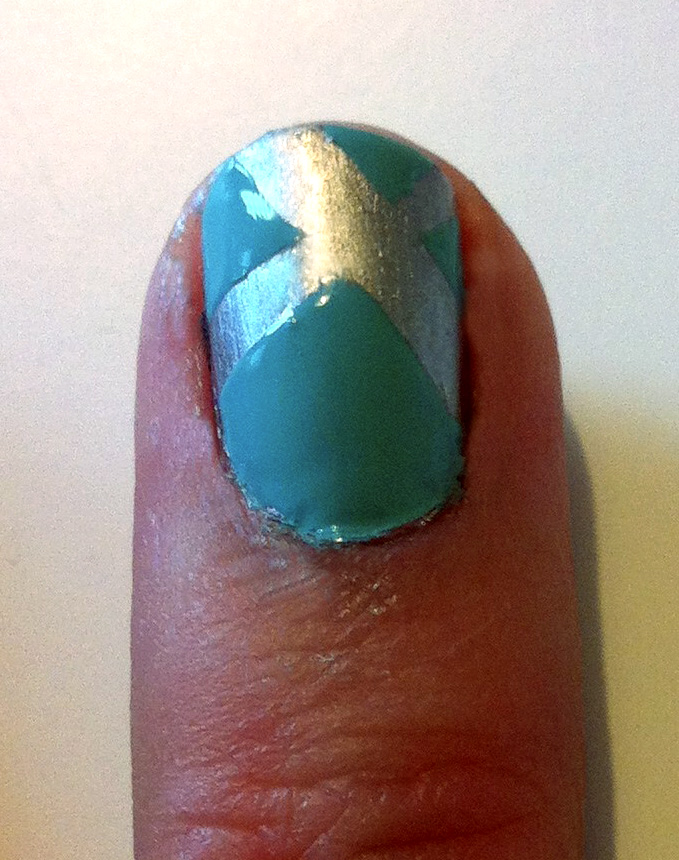
Above left is the final look and to above right was my inspiration. Of course I had that little blue box in mind for this technique. I found this Tiffany blue color “For Audrey” by China Glaze and thought this look would be perfect. I used the cross design because it reminded me of the X the ribbon makes on the box.

Undercoat: I started this look with 2 coats of a silver polish. To the left is the silver color I used, “Loophole” by Essie. I’m pretty much obsessed with this silver color because it has just the right amount of shine. Not crazy shine like chrome, but not dull enough to be considered grey. Perfect 925 silver ;). I even wore just these silver nails for a day because I love the color and wanted them completely dry before the next step! This technique would also be VERY cute with a bright white as the undercoat to match the Tiffany & Co box ribbon (or Red around Christmas time hee hee).


Tape: Next comes the not so fun part. This takes a while and it is QUITE a process, but the look is so worth it! Make sure your undercoat is completely dry before starting the tape otherwise your undercoat will peal! This will be sad and you will have to start all over- so just go read a book or watch a movie haha. To the left shows how I cut the scotch tape into stripes with a scissors. You need a very sharp scissors to avoid the tape bending instead of cutting clean. This is necessary to make a straight cut. I tried to make the strips proportional to my nail, just like the ribbon is proportional to the box.

Technique Steps: So here is the best way the taping and painting works…
1.  Tape all 5 nails on one hand. Make sure you mark which one is on top. Once you paint over you will not be able to tell. I folded down the end of the tape strip on the bottom so I knew which one to pull up first after polishing. Also make sure tape is pushed down securely  and there is no air bubbles.
2.  Paint the pinky first. This way you will not smudge your other nails as you go. Do an even coat: not too thick, but thick enough to not have to do a second coat.
3.  IMMEDIATELY remove the pinky nail’s tape. If you don’t do this right after you paint the polish gets tacky and smears.
4.  Move on to paint the ring finger, and immediately take off the tape again.
5.  Repeat step 4 with the rest of your fingers.
6.  Let this hand dry before you start cutting tape for the other hand. This prevents many smudges and frustration…
7.  Tape the other hand, start with the pinky again, and repeat process.

Summary: Tape hand, paint pinky, remove pinky’s tape, repeat… Tape other hand, paint pinky, remove pinky’s tape, repeat…


To the left is a nail after the tape is removed. As you can see it is easy to tell the different thicknesses of the silver and blue polish. That is why a thick coat of fast drying top coat is necessary. I used Seche Vite. This soothes the nail and prevents chipping.


And I said, what about, nails just like Tiffany’s…. :)


March 2, 2012

Technique: The Mocking Jay


Okay, so I know The Hunger Games Trilogy was written for teenagers, but I read all three and completely loved them (and I happen to know many other young adults enjoyed them). Not to mention that the trilogy is ranked top 1, 2, and 3 on USA TODAY's Best-Selling Books list .  I’m so excited for the movie to come out March 23! 

Even better news: China Glaze just came out with a whole collection dedicated to The Hunger Games. A pic of the colors is to the left. The ones I had to have were “Harvest Moon”, “Agro”, and “Smoke and Ashes”. I really want more though! Luxe and Lush looks gorggggggeous.

The first one I wanted to try was “Harvest Moon” and I decided to attempt a little Mocking Jay symbol on one of my nails. Didn’t turn out the greatest, but I thought I’d share anyway!  

Below shows the steps I took to make the Mocking Jay symbol. I wish I would have stopped at step 4 because I almost like the look of it not filled in better. Oh well! PS. wow I need a better camera... the quality of these pics is awful.


So here is the final look. I used a gold Stripe Rite Polish to make the mocking jay. It was fairly easy to use and I love the gold color. 


 I am definitely going to use this “Harvest Moon” color a lot! To the left is just the polish on my nails. It’s such a pretty bronze color. Definitely can’t use it with black though because it looks way to Halloweeny. More Hunger Games looks to come I’m sure!

If you try a Mocking Jay symbol on your nails... 
“Good Luck and may the odds be ever in your favor!”


February 26, 2012

Technique: Diagonal 2-tone


I got the idea for diagonal 2-toned tips look from one of my good friends Kaci’s stylish nails. A picture of the nails she did is to the left. She did a diagonal two tone with nude and black on the ring finger. I thought this look would look awesome on all my nails so I tried it out...


Since I am obsessed with glitter polishes lately I used a glitter instead of a solid as my tip color. The colors I used... Base: “Violet Vixen” by L’Oréal Paris. Tip: Gem Crush in “Big Money” by Sally Hansen.

Other great color combos would be:
- light color base, darker variation of same color as the tip.
Example: base= pale blue, tip=navy
Or...........base= pale pink, tip=bright red
- neutral color base, black or dark brown or dark grey tip
            Example: base=nude, tip= black (like Kaci’s nails!)
- bright and light base, brighter and darker tip.
Example: base=neon yellow, tip= hot pink.
Or.......... base=neon orange, tip=lime green.


 I started with the base color I new I wanted (Violet Vixen) and painted all 10 nails that color. Then I tried the diagonal tip on just one nail to make sure I liked the color and made sure it turned out opaque enough to cover the base color. That’s why all my above combo’s have the lighter color for the base... you want to make sure your tip color completely masks the base color. The glitter polish I used was very thick and I wanted it to completely mask the violet... which it did!


So then I moved on to tape all my nails with clear scotch tape (above). It was useful to use this kind of tape because you can see if the tape is rising up anywhere on the nail.. you dont want your tip polish to bleed under the tape! For the most part I tried to leave a little more space for the violet.. I thought it would look nice if the diagonal was closer to the top so it looks more like a tip accent then half and half. I thought half and half might be a little overwhelming on all my nails with that much glitter :) 


Dont forget to angle your right hand the opposite direction of your left hand! It looks more symmetrical that way. Above is my right hand after I painted on the Gem Crush polish.

 Now comes the tricky part: peeling off the tape. I would recommend doing this right after you paint the tips on one hand... This way you can fix up your messes right away because the polish is still moldable. In the second picture on the left I am using a nail art stick, but I found that even a light press of my finger worked just as well. As you can see in the top picture the tip polish fans up a little bit right where the tape was.. If you just tap it down with your finger it flattens out and looks great!


So here is the order of how I did this, it worked out pretty easy with no mess ups this way:
    1.     Paint all 10 nails the base color. Let dry COMPLETELY. Optional: one coat of quick dry topcoat.
    2.     Tape one finger and test out tip color.
    3.     If you like it, tape the rest of the fingers on that hand and paint on the tip color.
    4.     Remove tape and press down mess ups, one finger at a time.
    5.     Paint on a thick, clear top coat and let dry.
    6.     Repeat steps 3-5 on other hand.


 Violà !  Here’s a final look at the tilted 2-tone tip technique (say that 5 times fast haha).


February 20, 2012

Tip: Pearlescent nails


I gotta say, this is the coolest top coat I have ever come across. This sparkly clear polish makes any pastel polish look like a pearl! The polish is called Diamond Strength No Chip Color in “Diamonds” by Sally Hansen. And the best part is, you don’t need a topcoat when you use it because it’s basically clear and it’s a No Chip polish.


Here I tried it out on 5 different pastel colors. I just picked some of the pastels I had in my collection. Here we’ve got an ivory, a light grey, pale pink, mint green, and lavender. Colors 1, 3, and 5 needed a coat of French white underneath to get the color I was goin’ for (otherwise they were too shear).


I really wish that I could have photographed this in the daylight because this photo really doesn’t do it justice! I mean you can’t even see how awesome the ivory looks... so much like a pearl! This topcoat really does make a polish look pearlescent, not just sparkly. But this is the best I could photograph at night J didn’t want to go all day at work with multicolored nails haha.

I decided to go for the light grey color for all my nails. The color is “Cocktail Ring” by Essie. I really loved all the colors, but I thought this one looked really unique with the Diamonds topcoat. Not quite like a silver/chrome, but still with a metallic sparkle. I couldn’t help looking at my pearly nails all day!


February 17, 2012

Tip: White makes it BRIGHT


This is the most simple and cheap tip ever. In this post, I used 3 colors from a cheapo nail polish set I got from Claire’s. The point of the tip is to make any shear polish really pop. The above photo was taken on a verrrry cloudy day and look how bright pink the polish looks!


To make bright shear polishes even brighter, all you have to do is start with one even coat of bright white nail polish. On top of that you will only need one even and light coat of your color nail polish. To the left are 2 photos of examples I did. In each photo, the left finger has 2 coats of the nail polish alone, and the right finger has 1 coat of white and 1 coat of the color.

The difference is clear (and not shear haha). The left finger in each photo you can even see the whites of my nail, which means if you get dirt under your nails you’ll still be able to see it... gross. Below is just another picture of the difference in color. 


Another pro of this tip, it doesn’t just look neon in the daytime... Because you are putting a white underneath a shear, your nails will also glow under a black light. Looks awesome at a night club ;) 

February 7, 2012

Technique: Vday x 3!


What kind of Valentine are you???


Valentine’s Day is only 1 week away… so it’s time to pick a flirty polish for the holiday of love! First you must decide what kind of Valentine you are: Sweet, Sexy or, Sassy! This post has 3 looks to satisfy all! Of course, if you hate Valentine’s Day you could always stop reading here and go paint your nails black haha.

Base colors... I wanted to show you these three colors first because if you don’t feel like designing or don’t have the time, these are great Valentine’s colors all by themselves. From the left we have: Burgundy by FLARE (from Urban Outfitters I think.. but burgundy is a popular color for most brands), mod square by Essie, and it’s in the bag by Essie.

Sweet:
For this sweetie pie look I used two coats of this bubble gum pink nail polish called mod square by Essie. For the hearts I used my Sally Hansen French Tip Pen. I have the pen with the pointed tip, not a flat tip, so it was easy to make these teeny hearts. I would suggest only doing one finger on each hand (thumb or ring finger would be cute) because it takes a while to do all these little hearts.


Sexy: 
This look was super easy. I was going for a black fishnet look over a pale pink, but you could also use a nude/beige/tan color for the base. I did 2 coats of this base because it was very sheer and made sure it dried COMPLETELY. If you don’t let the base dry all the way, this next step will fail miserably, trust me.. haha. To make the black cross hatch it was pretty easy. I used a black SH nail art pen. The key to make the stripes look more like fishnet is to make the crosshatch elongated, not square. Basically, more like diamonds and less like tic-tac-toe squares.


Sassy:
If anyone knows me they would say I am definitely a sassy valentine… so of course this was my choice. It was also the most time consuming so I did a more detailed description of what I did. First I let the burgundy base color set completely. I actually ended up doing the base color one day and the detail/tip the next day. This is because I used French tip tapes (which I usually hate) and they can tend to remove the base polish if you use them when your base isn’t dry... it’s a big mess.


So here is what my nails look like with the tapes on them. The key to applying these buggers straight is to start in the center of the nail. Tap the tape to the center of the nail, and then if it lands a little crooked you can tip the edge up or down to straighten. Then flatten the tape ALL the way to the skin. I even use my other hand’s nail to crease the tape into the area between my nail and skin... if that makes sense? 


Anyway after getting the nail tapes applied, I filed my nails to be the same roundness/arc as the tapes. It’s not necessary, but I think it looks a lot nicer.


Then I used this awesome magenta tinted SH Gem Crush polish called Lady Luck. It went really well with the burgundy but would also go well with a bright magenta. Anytime your using tapes the key is to dab fairly heavy strokes of the polish so you don’t have to apply a second coat. 


After this dries, remove the tapes and apply a heavy clear coat. I used my Essie top coat because it seamed a little thicker than others. The Gem Crush polish is pretty think so you want a thick top coat to level out the rest of the nail.

Below is the lovely finished product.. sassy no?


Have a SWEET, SEXY, and SASSY Valentine’s Day!!!

<3 <3 <3