March 27, 2012

Technique: Moon Phases

Phases of the Moon

This look was inspired by the phases of the moon. It was actually quite simple. The only difficult part was making my right hand’s “moons” look symmetrical to my left.


First step was the shinny color for the moon. I think a silver, gold or grey would look good for this. The color I used was China Glaze in “Swing Baby”. It’s a light gold with a pale pink tint to it. VERY pretty. I wore this one by itself for a day before I did my moon phases just because I liked the color so much. To the left is this base coat, 2 coats.


Next was taping. As always, nails have to be COMPLETELY dry before taping. I used French tip tapes for this look. On the left, starting with the pinky (1) I gradually tapped less to more of my nail. Nails 1, 2, and 3 I used the bottom of the arc as a guide. For nails 4 and 5 I wanted the moon to be mostly full, so I used the top of the arc as a guide. It was difficult because you have to think in negative space. Remember, you cover with the tape is what will be showing when your done.


I used a solid black paint for the shadow on the moons. This one is Beguiling Black by Maybelline express finish. I have a step by step of what the painting looks like below. Tape all nails on one hand first. Then paint and remove tape immediately one nail at a time.


And just as an afterthought I added a stripe of silver in between the moon and the shadow. Here is what it looks like below.


Mooooon Shadow Moon shadow =]

| La


March 26, 2012

Tip: Alternating 3 Colors

This tip is simple and maybe obvious to some, but I just did my nails this way so I thought I’d blog it. It is about alternating 3 colors on your nails. First thing to mention I guess would be color. In my opinion, the best color combos are either all warm colors (reds, pinks, oranges, yellows) or all cool colors (greens, blues, indigos, purples). Another good way to do alternating colors is shades of the same color (like lavender, purple, dark purple). For this one I used some happy spring citrus colors, i.e. grapefruit, orange, and lemon. The polishes I used from left to right in the below photo: Essie in Mod Square, China Glaze in Peachy Keen, Sinful Colors in Pull Over.

Okay, so in terms of which colors to paint which nails. The obvious way to do it would be ABCAB CABCA. However, if you do it this way your pinky and pointer finger are polish A on both hands. In my opinion that pattern looks too symmetrical and a little funny looking. I would rather have none of my left side nails matching my right. So the is the pattern I decided on is: ABCAB CBACB. My painted nails are below. I think it looks more random which is what I wanted!

Have fun and happy polishing! <3 La

March 23, 2012

Technique: Crosshatched Tips


This technique was pretty darn simple. All you need is a nail art brush or polish. Here I used a Stripe Rite polish because its very easy to use and I had it in the color I wanted. I am sooo excited to see The Hunger Games tonight so I HAD to use another Hunger Games polish (last one I swear! Haha)

Below is the polish I used for the base coat. It is China Glaze in Agro. I did two coats.

I used a Metallic Gold Stripe Rite Polish for the cross hatch because the Agro polish had an obvious gold sparkle to it, I knew it would look great together. If you don’t have a nail art polish or a nail art brush you can just use a teeny tiny paint brush and dip it in nail polish. However I recommend one of the first two options because they are easier to control/use. You can get both at Sally Beauty supply.
To the left is a picture of the first step to the crosshatch. First I did a diagonal swipe of lines a couple millimeters apart. I did this on all ten nails in one direction. Be careful not to extend to the halfway point of the nail because then it stops looking like a tip design. I did these lines quickly and carefree. You want the lines to be a little messy. Straight lines would be boring ;-)
Next, I did the same process in the opposite diagonal. To the left is after the second crosshatch (I know, great pic quality!). The key to a good cross hatch is some thicker lines and some lighter and thinner lines.


Below is the final look! Soooo easy and so stylish. Happy Polishing!

<3 La

March 20, 2012

Tip: Spring 2012 Colors


I know not everyone loves spending time on nail designs so I thought I’d do a Tip on colors. What better day to post about spring colors than the first day of spring! Above are the spring 2012 colors (according to Pantone) and all their fancy names. In terms of nail polish, I researched different sites and spring collections and I found these to be the most popular nail polish colors this season: Purple, Green, Hot Pink, Orange, Blue, and Nude.

Below I showed my fav nail polishes in these spring colors in three different types: Pastel, Shimmer, and Bold… have a look!

Purple
ESSIE in To Buy or Not to Buy (PASTEL)
NARS in Diamond Life (SHIMMER)
China Glaze in Gothic Lolita (BOLD)

Green
RBG in Dew (PASTEL)
ESSIE in Navigate Her (PASTEL)
China Glaze in Agro (SHIMMER)
Sephora by OPI in Totally Karma (BOLD)

Hot Pink
Nicole by OPI in Great Minds Think Alike (PASTEL)
Essie in Tour de France (SHIMMER)
Sephora by OPI in What Aura Gonna Wear (BOLD)


Orange
Essie in A Crewed Interest (PASTEL)
China Glaze in Riveting (SHIMMER)
Essie in Orange, It’s Obvious! (BOLD)

Blue
China Glaze in Kinetic Candy (PASTEL)
Sephora by OPI in Bright as a Feather (SHIMMER)
China Glaze in Shower Together (BOLD)

Nude
RGB in Vellum (PASTEL)
China Glaze in Fast Track (SHIMMER)
Sephora by OPI in Neutral Beauty (BOLD)


March 19, 2012

Technique: Glitter Layered Gradient


I am getting so excited for the Hunger Games movie to come out this weekend! I was so excited I had to buy another Hunger games polish. I think this is my new favorite. . . Luxe and Lush by China Glaze! It’s the glitter polish in the above pic. It looks kind of like broken crystal or quartz. Very Hunger games Capitol style. I just |love it.
 

For the base I used a very pale pink. This one is Step Right Up! By OPI. I used 3 coats because I didn’t want it to be transparent.


Below is only one coat. As you can see the glitter to polish ratio is quite small. So I decided to do a layered gradient!

Below left is the second coat of glitter polish. I started about a third up the nail and did an even layer. Below right is the third coat of glitter polish about two thirds up on my nail.

To apply this glitter polish thicker you have to dab it more than swipe it.  If you swipe to fiercely the glitter comes right off with the brush. If you dab with the brush, the glitter pieces stick to the nail better.

Add a top coat and there you have it! A glittered layered gradient. Only downside it is quite a few coats of polish. Next time I will probably only do 2 coats for the base.

Happy Polishing!
|La

March 17, 2012

Critique: Color Change Polish


Since we have had such wonderful and sunny weather here in the Midwest lately, I decided it was a perfect time to try this color-changing polish by DEL SOL. I like it! It makes me feel like a kid again :)

The kind that I used changes from an iridescent ivory to “Pretty in Pink”. The left above is inside and the pink on the right is outside in the sun. Its a thin polish so I had to do a coat of white underneath to make it pop.

Overall, it’s a fun polish, but only changes when you are in direct sunlight. When my nails were outside but hiding from the sunrays for a bit it turned back to ivory. To the left is the polish when it was overcast/cloudy out. It was more in-between, like a pale pink. Still pretty though!

Another sad point is that when your inside all day (like I was working for 8 hours yesterday) it just made me want to go outside even more! Hmf.. haha
        
My advice for this one is to get a color that changes more subtly. This one was nice because the in-between was pale pink and not an icky color. Another good choice would be pink to purple.

Have fun in the sun!
|La


March 15, 2012

Technique: Easy Burberry


I didn't start this blog to just show off nail art that I do. I really wanted to make a blog that was helpful to anyone that could use tips for nail styles you could do yourself. So the point of this technique is to try and make something difficult more simple. I have seen a million versions of the Burberry plaid on nails. They all look so intricate! So here is a step by step instruction on an easier variation of the Burberry plaid design.

1. I started with a tan/beige base. The one I used is just a cheapo nail polish from a clothing store. I did three coats to get a solid, even color.


2. Next I used a white polish to make a horizontal stripe. I tried to make it thick and only the width of the nail polish brush to make it one easy swipe. I really didn't worry about making the lines straight because I knew I was going to outline it in the next step. Made it a little faster/easier. The polish I used here is Sally Hansen Xtreme wear in "White On."


3. Step three.. the black stripes. I used a Sally Hansen nail art pen. I tried to make the lines as straight as I could. Have to make sure the pen is always very saturated with polish.


4. Lastly I wanted to switch it up a bit, so I used hot pink instead of burgundy. Much more me :). So first I did two verticle stripes closer to the left side of my nail. Then I did one horizontal towards the bottom of my nail. Quite simple. Here I used Stripe Rite polish in Hot Pink.


 So, there you have it. Still takes a little skill, but a much easier and less detailed version of the Burberry plaid!

March 13, 2012

Critique: Seche Vite


Two words: Seche Vite. This top coat is the best all time top coat I’ve ever used. I’ve heard of people saying it was a good one, but I just now got around to trying it. It is a fast drying and strong clear top coat that protects your nails VERY well. I think this was the first time I took off nail polish because I got bored of my nails, not because they were too chipped. So funny…


In terms of fast drying, it dries pretty good in about 15 mins and dries completely in about a half hour. This is great in terms of nail polish. I’ve messed up manicures that have already dried for 2 hours before.


In terms of durability, it’s definitely the best I’ve tried. First of all, with this polish I received ZERO chips for the first 2 days. This is unheard of for me since I tend to be clumsy and fidget a lot with my fingers/nails. The picture below (sorry not the greatest, tried to get all my nails in) is after 5 days of wear, including showering every day, washing dishes, typing all day, etc... I have a chip on my left pointer (from nibbling on my nail for better concentration of course) and overall all my nail polish wore down a little on the nail tips. Still, this is great improvement from any other top coat I have used.


Summary of Critique: Seche Vite is a MUST HAVE top coat. Love love love!

I got it at Sally Beauty for $8 (it was $10 at Ulta), but I found it for $4.49 on this site... nice!


March 7, 2012

Technique: Little Blue Box


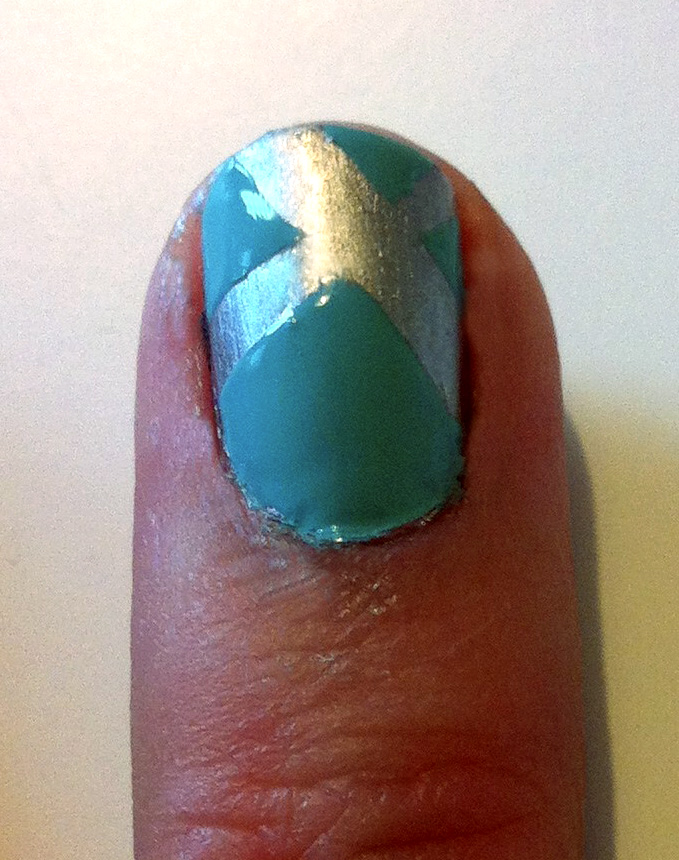
Above left is the final look and to above right was my inspiration. Of course I had that little blue box in mind for this technique. I found this Tiffany blue color “For Audrey” by China Glaze and thought this look would be perfect. I used the cross design because it reminded me of the X the ribbon makes on the box.

Undercoat: I started this look with 2 coats of a silver polish. To the left is the silver color I used, “Loophole” by Essie. I’m pretty much obsessed with this silver color because it has just the right amount of shine. Not crazy shine like chrome, but not dull enough to be considered grey. Perfect 925 silver ;). I even wore just these silver nails for a day because I love the color and wanted them completely dry before the next step! This technique would also be VERY cute with a bright white as the undercoat to match the Tiffany & Co box ribbon (or Red around Christmas time hee hee).


Tape: Next comes the not so fun part. This takes a while and it is QUITE a process, but the look is so worth it! Make sure your undercoat is completely dry before starting the tape otherwise your undercoat will peal! This will be sad and you will have to start all over- so just go read a book or watch a movie haha. To the left shows how I cut the scotch tape into stripes with a scissors. You need a very sharp scissors to avoid the tape bending instead of cutting clean. This is necessary to make a straight cut. I tried to make the strips proportional to my nail, just like the ribbon is proportional to the box.

Technique Steps: So here is the best way the taping and painting works…
1.  Tape all 5 nails on one hand. Make sure you mark which one is on top. Once you paint over you will not be able to tell. I folded down the end of the tape strip on the bottom so I knew which one to pull up first after polishing. Also make sure tape is pushed down securely  and there is no air bubbles.
2.  Paint the pinky first. This way you will not smudge your other nails as you go. Do an even coat: not too thick, but thick enough to not have to do a second coat.
3.  IMMEDIATELY remove the pinky nail’s tape. If you don’t do this right after you paint the polish gets tacky and smears.
4.  Move on to paint the ring finger, and immediately take off the tape again.
5.  Repeat step 4 with the rest of your fingers.
6.  Let this hand dry before you start cutting tape for the other hand. This prevents many smudges and frustration…
7.  Tape the other hand, start with the pinky again, and repeat process.

Summary: Tape hand, paint pinky, remove pinky’s tape, repeat… Tape other hand, paint pinky, remove pinky’s tape, repeat…


To the left is a nail after the tape is removed. As you can see it is easy to tell the different thicknesses of the silver and blue polish. That is why a thick coat of fast drying top coat is necessary. I used Seche Vite. This soothes the nail and prevents chipping.


And I said, what about, nails just like Tiffany’s…. :)


March 2, 2012

Technique: The Mocking Jay


Okay, so I know The Hunger Games Trilogy was written for teenagers, but I read all three and completely loved them (and I happen to know many other young adults enjoyed them). Not to mention that the trilogy is ranked top 1, 2, and 3 on USA TODAY's Best-Selling Books list .  I’m so excited for the movie to come out March 23! 

Even better news: China Glaze just came out with a whole collection dedicated to The Hunger Games. A pic of the colors is to the left. The ones I had to have were “Harvest Moon”, “Agro”, and “Smoke and Ashes”. I really want more though! Luxe and Lush looks gorggggggeous.

The first one I wanted to try was “Harvest Moon” and I decided to attempt a little Mocking Jay symbol on one of my nails. Didn’t turn out the greatest, but I thought I’d share anyway!  

Below shows the steps I took to make the Mocking Jay symbol. I wish I would have stopped at step 4 because I almost like the look of it not filled in better. Oh well! PS. wow I need a better camera... the quality of these pics is awful.


So here is the final look. I used a gold Stripe Rite Polish to make the mocking jay. It was fairly easy to use and I love the gold color. 


 I am definitely going to use this “Harvest Moon” color a lot! To the left is just the polish on my nails. It’s such a pretty bronze color. Definitely can’t use it with black though because it looks way to Halloweeny. More Hunger Games looks to come I’m sure!

If you try a Mocking Jay symbol on your nails... 
“Good Luck and may the odds be ever in your favor!”